12 KiB
Linux 201: Web Server Setup
Introduction
-
Goals
- Understand the process of setting up a web server
- Understand why security is important when setting a web server.
- Setup a basic web server to serve static files
-
Non-goals - links to useful tutorials will be provided at the end of this lab sheet
- Setting up HTTPS - This requires a domain name
Things to mention in the slide deck
- Apache vs Nginx
- Thread-based vs event-based servers
Basic Security
root is the administrative account of Linux systems. Owing to the extremely broad permissions granted to root accounts, one of the core tenants of Linux security is ensuring each user has their own account.
This is because root can be used, even accidentally to damage or destory the system because of its extensive permissons. Having seperate accounts, such as "yourusername" also increases accountability and decreases the likelihood of system damage.
-
Creating a non-root account:
adduser "yourusername"We should create the new user as root.
Execute the command as above, replacing
"yourusername"with a desired username.During the setup, you may be asked for a password along with other information. You may customise this information as you wish.
usermod -aG sudo yourusernameNow that the user has been created, we should ensure that that user can execute commands with escalated permissions. These are called
sudopermissons.Execute the command as above, replacing
"yourusername"with the user created in the previous step.- The Linux security model: Knowing why you're typing your password
-
SSH
- Disable root login
- SSH Keys
Securing SSH
Used by servers and their administrators across the world to talk to one another, if someone manages to get in who isn't supposed to, they could do all kinds of damage!
The first, and easiest thing we can do it improve security is to prevent the root user logging in. We already have a non-root account that we use sudo with, so why allow direct access to root at all? Edit /etc/ssh/sshd_config, finding the line that says something like this:
PermitRootLogin yes
....and change it to
PermitRootLogin no
You may need to uncomment the line by removing the # symbol preceding it.
Once done, restart the ssh server like so:
sudo systemctl restart ssh
Your configuration might be slightly different (e.g. it might be PermitRootLogin without-password) - but the principle is the same. This adds an extra barrier to getting into your server, as now attackers must not only guess your password, but your username as well (some won't even bother, and keep trying to login to the root account!).
Key-based authentication
So we've created a new user account with a secure password (tip: use a password manager if you have trouble remembering it :-)) and disabled root login. Is there anything else we can do? Turns out there is.
Passwords are not the only we can authenticate against an SSH server. Public private keypairs can be used too - and are much more secure - and convenient - than passwords if used correctly. They are a pair of files on your computer, which are used when you try to login instead of a password. Without the private key, you can't login.
The exact way you do this depends on the operating system of the local machine you are using to connect to your server.
For Linux users
If your local machine is a Linux computer, then this is the section for you. If your local machine is a Windows computer, then skip this section and move onto the one below entitled "For Windows users".
If you are using Linux on your local machine generate your own public-private keypair like so:
ssh-keygen -t ed25519
It will ask you a few questions, such as a password to encrypt the private key on disk, and where to save it. Once done, we need to tell ssh to use the new public-private keypair. This is fairly easy to do, actually (though it took me a while to figure out how!). Simply edit ~/.ssh/config (or create it if it doesn't exist), and create (or edit) an entry for your ssh server, making it look something like this:
Host {bobsrockets.com}
    Hostname        {ip_address}
	Port			22
	IdentityFile 	{path/to/private/keyfile}
Change {bobsrockets.com} to a short name that's easy to remember. You'll be able to SSH into your server later with ssh short_name.
Change {ip_address} to match the IP address of your server (or, if you're lucky enough to have a domain name pointed at your server, use that instead).
It's the IdentityFile line that's important - replace {path/to/private/keyfile} with the path to your key file (e.g. ~/.ssh/id_ed25519).
With ssh configured, we can use a handy little utility called ssh-copy-id to copy the SSH public key to the server. Do that like this:
ssh-copy-id `{username}@{hostname}`
Where {username} is the username of the new user account you created earlier, and {hostname} is the short code from before when you editing your ~/.ssh/config file.
For Windows users
If your local machine is a Windows computer, then this is the section for you. If your local machine is a Linux computer, then skip this section and move onto the one below entitled "For Windows users".
This section will assume that you are using PuTTY to connect via SSH to your server. Content in this section is taken from this DigitalOcean tutorial.
Start the PuTTYgen program through your Start Menu, or by launching the puttygen.exe portable executable. The key generation program looks similar to this:
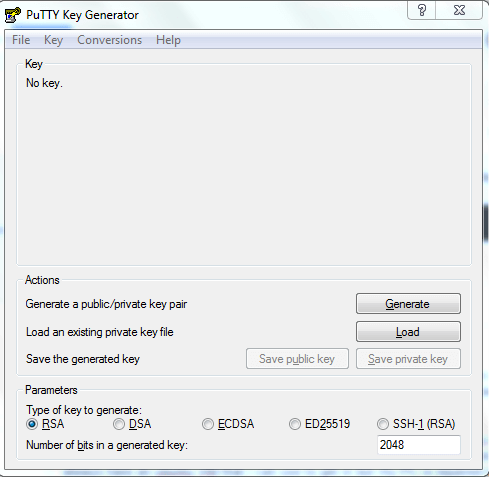
(Above: A screenshot of PuTTYgen. Taken from this DigitalOcean tutorial.)
Set the key type to ED25519, and click the generate button.
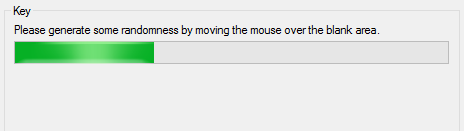
You might be prompted to "generate some randomness by moving the mouse over the blank area". This randomness, known as entropy, is used to create keys in a secure fashion so that other people can't reproduce them.
When the key is generated, you’ll see the public key displayed in a text box. Save this somewhere safe for later. Be sure to scroll within the text area so you copy the entire key.
Next, you’ll be prompted to enter a passphrase for your SSH key. This improves security by preventing someone who gains access to your private key from using it without also knowing the passphrase. You’ll need to provide your passphrase every time you use this key (unless you use SSH agent software that stores the decrypted key).
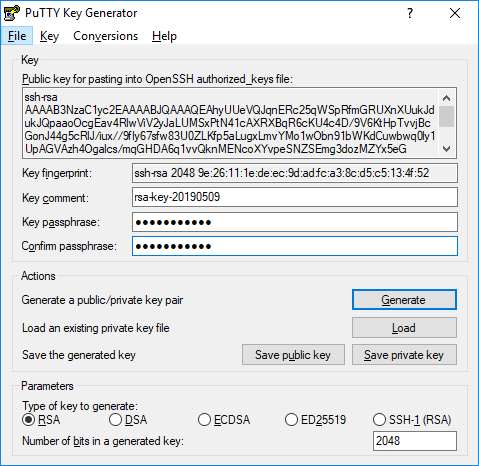
When you’re done, click the "save private key" button and select a secure location to keep it. You can name your key whatever you’d like, and the extension .ppk is automatically added.
If you have not entered a passphrase, you will be asked to confirm that you want to save the key without one. We strongly recommend using a passphrase, but you can press enter to bypass this prompt.
Next, you need to tell your server about your new SSH key. This is done by editing the ~/.ssh/authorized_keys file. Do that like this:
nano ~/.ssh/authorized_keys
Paste in your public key that saved earlier. Save it and exit, and then ensure it has the correct permissions like so:
chown -R username:username ~/.ssh
chmod 0700 ~/.ssh
chmod 0600 ~/.ssh/*
...replacing username with the username of the account you created earlier.
Now, try opening a new instance of PuTTY and logging into your server with the public key. Before hitting the login button, go to "Connection" -> "SSH" -> "Auth" and select your .ppk file.
If all is well, you should now be logged in with your new public/private keypair.
Setting up a firewall
Firewalls control how data is allowed to travel in and out of your computer. In Ubuntu, a firewall called ufw, the 'uncomplicated firewall' is already present. It acts as a nice front-end to iptables, which I find to be difficult to understand and use. We will be using that as our firewall. If for some reason it is not installed already, install it like so:
sudo apt install ufw
Activation
Ufw, by default, allows all outgoing connections and denies all incoming connections. This means that if you are using ssh to connect to your server, you will need to open the appropriate ports first before enabling ufw. Do that like this:
sudo ufw allow 22/tcp
Ufw will automatically configure iptables to allow incoming connections on port 22 that use tcp. I will talk more about allowing and denying different connections later.
Just in case ufw blocks your ssh connection and you are unable to get back in, you can use another program called at to schedule the disabling of the ufw so that you can get back in again. If you don't have it installed, you can install it with sudo apt install at.
sudo at -vM now +10 minutes
ufw disable
^D
Where ^D stands for CTRL + D. Now that you have it set such that ufw will disable itself in 10 minutes time, we go ahead and turn ufw on:
sudo ufw enable
It will warn you that this may disrupt any existing ssh connections you have open. Reply yes to this. Once it have been enabled successfully, you should check that you can still ssh into your server (if that is the method that you are using to control it). If yes, great! If not, ufw will disable itself in 10 minutes and then you can try again.
Now that we have ufw enabled, we can cancel the at job we created to disable ufw. Type sudo atq to list the jobs you have schedules, and sudo atrm <number> to remove it, where <number> is the number of the jobs that you want to delete.
You may also want to check the status of ufw to make sure that it is enabled, or to get a list of the rules that are currently in force. You can do that like this:
sudo ufw status
Status: active

To                         Action      From
--                         ------      ----
22/tcp                     ALLOW       Anywhere
22/tcp (v6)                ALLOW       Anywhere
Allowing connections
Since we're going to be setting up a web server, we'll need to allow it through our new firewall. Doing so is easy. Simply do this:
sudo ufw allow 80/tcp
Ufw will automatically configure iptables, in this example, to allow all connections on port 80 that use TCP. It will also configure it appropriately for both ipv4 and ipv6.
If you ever want to incoming connections on another port in the future, replace 80 with the port number you want to allow and tcp with udp if needed.
Ufw also understands several protocol names, and can configure itself accordingly:
sudo ufw allow http
sudo ufw allow imap
Installing a Web Server
With our server secured, we can now install our web server. In this tutorial, we'll be using Nginx.
- systemd services
- Nginx is a service
- Installing Nginx
sudo apt install nginx
Configuration
/etc/nginx/nginx.conf/etc/nginx/sites-available/*/etc/nginx/sites-enabled/*